Little B’s big boy room

This project has taken us months. I blogged some before pictures back in May, and at that stage we were probably a few months into the work. Mainly because we weren’t in a huge rush to do it as the little man has been happy in his current nursery, but we also needed to get a few trades in for jobs that were outside of our skills (largely plumbing!). My brother is a carpenter and yet again he’s been a huge help – brand new skirting board, plus refitting the door after the carpet was put down.

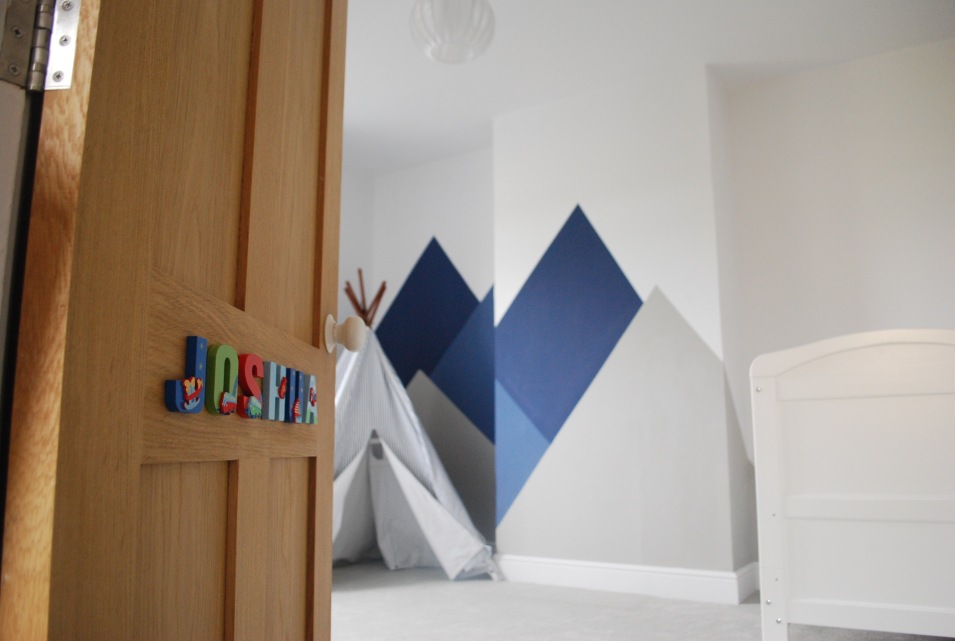
I had a vision in my head for how I wanted this room to look, more contemporary than some of our other rooms, as eventually if we get planning permission for the extension I think the house will gradually move towards that style. It needed to be something that would grow with him for a few years to come. He loves his books so I also knew I wanted to create an area where he could read, that’s where the teepee corner comes in.

My starting point was the feature wall, with that plan in my head I wanted to keep the rest of the room white (Farrow and Ball’s Wevet), which is quite unusual for me. Mr B kept looking at me like I had finally lost the plot when I covered the wall in masking tape to paint the mural. I used three colours for the mountains to give some variation, I took the design around the fireplace (which we’ve left covered up for now, we didn’t have the energy for that this time round, plus it leaves more room). I’m so pleased with the fabric, it took me ages to find something that would work with the scheme but I think the pattern goes perfectly with the mountains (it’s a Clarke & Clarke fabric called Brio). I interlined them to keep them looking full and decided in the end to just do a tape header, I had planned to do pinch pleats but it wouldn’t have looked right. The teepee is from the Great Little Trading Company and the storage units are Ikea. I will still need to add a few finishing touches such as floor cushions and some prints for the wall but it’s almost there and he loves it.

img_2654

dsc_0154

My top tips for planning a lounge

Now I’m sure they are just being nice but my friends often say how relaxing our lounge is. It’s a lovely compliment as we did put a lot of work into it. We wanted an elegant, yet cosy living space and that’s quite a tough balance to pull off. I’m by no means an expert but I’m often asked for advice on colours or furnishings and how we planned our room so this got me thinking recently about my five top tips I could share for designing a new living space…

1. Live in it first.

There’s always that temptation when you first move into a new home to make changes or go crazy with the paint brush but I really think it’s important to just live with it as it is for a while, especially for a lounge or main living space. See how the house flows, how you want to use the space and also how the light can change in a room throughout the day. If you’re just redecorating a room in a house you’ve lived in for a while you’ll already know all this – and that’s possibly why you’re wanting to redecorate.

2. Focal point.

You might have a feature that’s already part of the space that will be key to your new room scheme. For us this was our fireplace, which was why we choose to have cupboards and shelving designed and built to work alongside it. It’s worth sitting down and thinking about how you want the room to work around a focal point that already exists. If you don’t have something, or perhaps have a more contemporary home – think about what you want the eye to be drawn to when you walk in. I’ve a bit of a pet hate about TV’s being the focal point of the room, but that’s just a personal preference. I’d much rather have a sociable living room which will work for a number of uses.

3. Furniture

Very obvious I know, but always think about what furniture you want to incorporate. For a lounge – seating will clearly be key, have you got enough of it? If you don’t have a lot of room, think about soft furnishings (big cushions you can pull out for extra seats when there are extra bums) or furniture that has a dual purpose. We bought a gorgeous Laura Ashley footstool, which we can also use as a coffee table (with a tray on) or for extra seating when there are lots of us. Think about your storage options too – do you want to hide stuff away for a more minimalist look or display your finds for all to see (you all know I go with the latter!).

4. Colours

It’s tempting to reach straight for the paint charts – but I think if you spend a bit of time thinking through the design of the room first it pays off. Colour is very much down to personal choice – and your choices will no doubt reflect your personality. Colour can really affect the mood of the room – so think about what type of atmosphere you want to create. When I’m testing colours for a room I always put a bit on every wall as you’d be amazed how different they can sometimes look depending on light. Check test patches too in the morning and evening light as again at different times of the day colours can look different. Remember that different paint finishes can also change the way a colour scheme looks. I always use eggshell on our woodwork for example as I’m not keen on a gloss finish.

5. Enjoy it.

Lastly, there’s nothing like that feeling when a room is finally finished, the paint is dry, everything is in its place and you can sit down (in my case ideally with a glass of wine) and enjoy all your hard work. Be proud of it and show it off.

Ding dong the blue carpet’s gone…

Out of all the rooms in our home this was one of the biggest jobs (it felt even bigger than dealing with the wall incident in the main bedroom). We’d always planned to tackle this room last, as hideous blue carpet aside, it was in a lot better shape than the rest of the house.  We love our stove, which we use all through winter, so that was always going to stay, but we hated what had been done to the fireplace (see picture below). Having uncovered the chimney breast in our bedroom we knew that the chances were there was something lovely hiding behind all the cracked plaster.

DSC_0878 DSC_0887

It took a whole weekend but we chipped away at the plaster and uncovered some lovely brickwork, which we re-pointed to form our main feature. I’d already begun to form an idea for the colour scheme, I wanted something a little more contemporary so opted for a grey palette. I’ve stuck with Farrow & Ball.  For the walls I used Purbeck Stone and Ammonite for the woodwork. My brother is a carpenter and he created the bespoke cupboard and shelving in the alcoves – using a piece of American walnut for the cupboard top and mantle piece, it’s a gorgeous piece of wood and against the grey Ammonite really stands out. I’m not a huge fan of symmetry (or straight lines) so on the right of the fireplace I wanted a free standing piece of furniture for the TV, we found this bargain on Ebay and with a little TLC and a lick of paint, it worked perfectly. I handmade the curtains and soft furnishings, using a Laura Ashley fabric for the curtains – Bacall which is a linen mix, I interlined them too to make the room extra cosy. Other finishing touches include the freestanding lamp which provides another level of lighting, and the upholstered Laura Ashley footstool which doubles up as a coffee table. It’s been a long project, but I think this is now one of our favourite rooms, now pass me a cup of tea…

DSC_0391 DSC_0386 DSC_0393

DSC_0390 DSC_0397

DSC_0374


Mirror mirror on the wall…

For some reason, we’ve a shortage of mirrors in our home, but a recent haul at a northern auction has helped. Both had seen better days but a bit of TLC and a lick of (Farrow & Ball) paint has soon sorted them out.

This one was a dark wood one and I’ve painted it in Farrow & Ball’s Blackened.

DSC_0334 DSC_0336

For this one I chose Farrow & Ball’s Shaded White and it’s really brought out the detailing around the edges.

DSC_0329

Whenever you paint furniture, preparation is key – make sure the surface has had a light sand and I find using a weak sugar soap solution helps make the surface as clean and smooth as possible. A good quality primer should be used too before you apply your paint, I always tend to use eggshell as I love the finish.